
Introduction:
If you're a plant enthusiast, you know that finding the perfect cabinet to display and care for your indoor greenery can be a challenging task. I like IKEA's Milsbo cabinet as an inexpensive, versatile, and stylish option that can be customized to fit a wide variety of plants. In this post, I'll guide you through the process and supplies necessary for building your very own IKEA Milsbo plant cabinet, helping you create a beautiful and functional greenhouse space for your plants.

If you need a helper Nash and Diesel are available for hire.
Choosing the Cabinet
Purchase the Milsbo cabinet in the size that suits your space and the plants you intend to house.
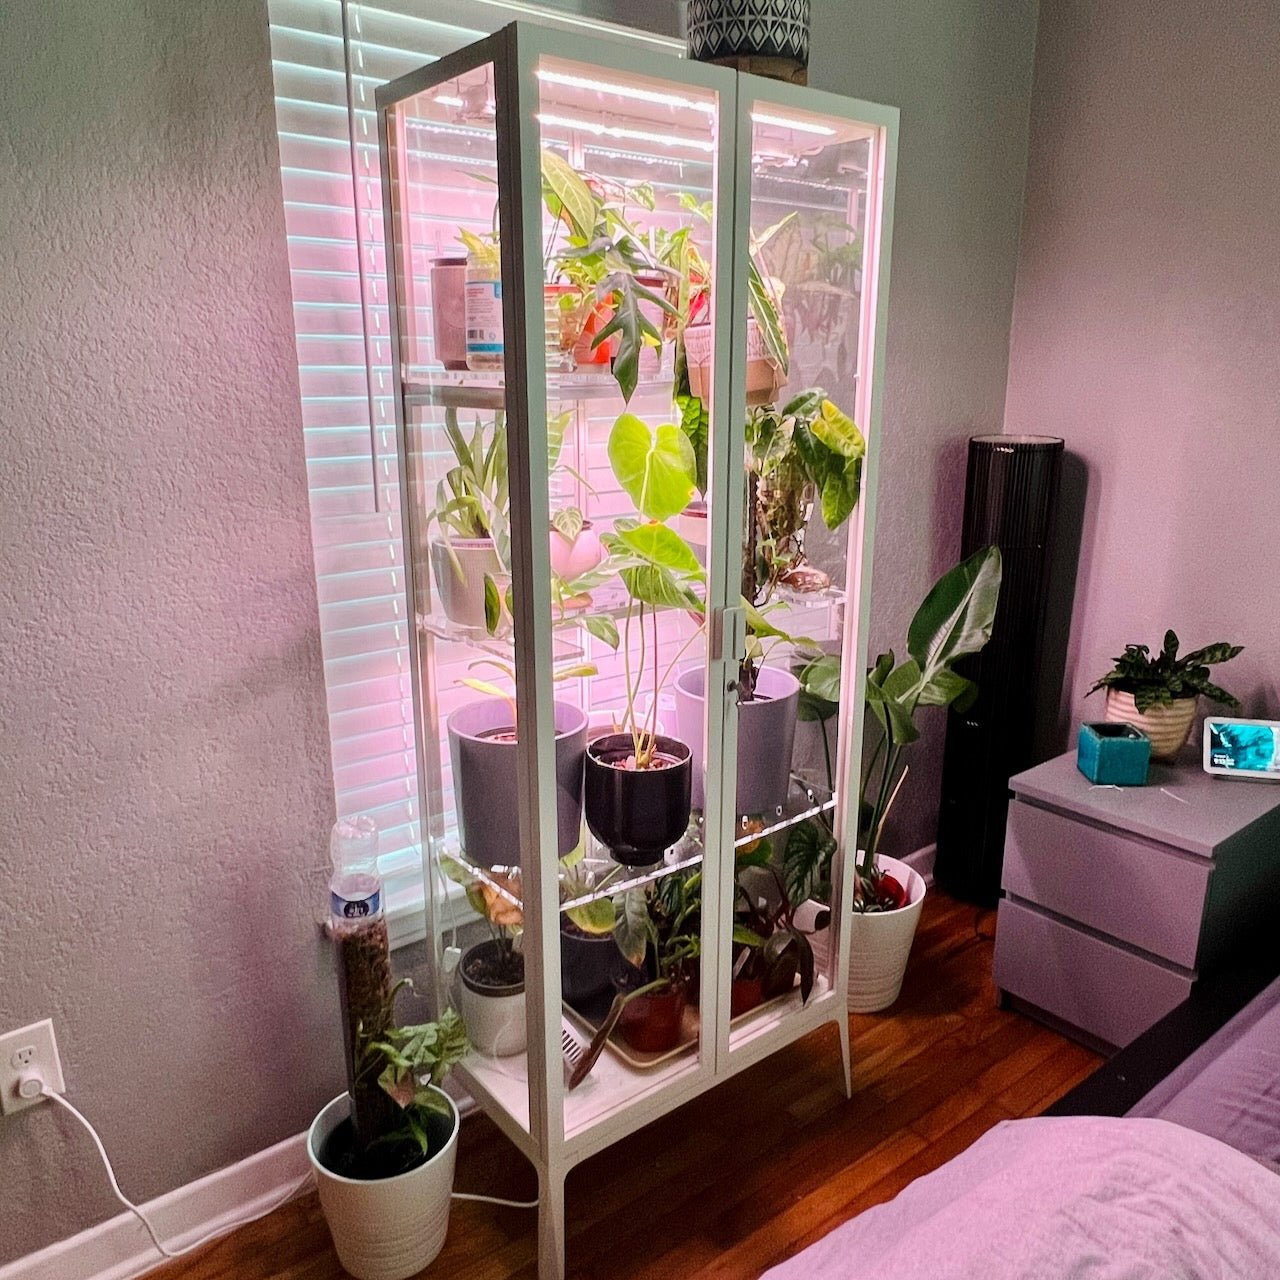
Milsbo Tall will require added shelving for all but the tallest of plants. Add a few shelves and its great choice for a collection of shorter plants with a few tall boys mixed in. The base unit will run $300 for 12.6 cubic feet of greenhouse - about $24 per sqft.
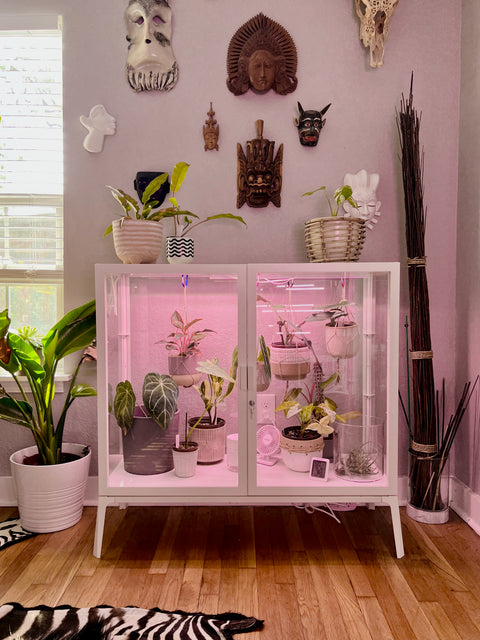
Milsbo Wide is a good fit for taller plants, I use mine without shelving to house plants up to about 30" tall with a reasonable amount of room for the lights. The base unit costs $260 and provides 10.8 cubic feet of greenhouse, again right around $24 per sqft.
Having built both, for display of just plants I prefer the tall, but think the wide works in better with my home decor as a dining room accent. The wide version is also a little more airtight and seems to hold humidity longer.
Building the Cabinet
The first step in realizing your greenhouse cabinet dreams is to build out a stock Ikea Milsbo cabinet.
You can skip adding the glass shelving, the included shelves prohibit airflow and don't provide room to run the cords needed for accessories such as lights, fans and optionally a humidifier.
You'll need a phillips screwdriver for this step.
Cabinet Mods
Now comes the fun part, transforming your generic display case into a plant wonderland.

Cable management hole
Cord Management Hole
You will need some electronics such as lighting, fans and possibly a humidifier inside of the Milsbo. The cabinet exterior is tempered glass, which is not suitable for drilling. This leaves the top or the bottom as options for where to run cords through. I like the bottom as its easier to hide a power block this way. Find a suitable spot for your cord hole. Use earplugs (drilling metal in an enclosed space is loud) and safety goggles (you don't want to get tiny metal bits in your eye). Drill your hole using a 2" Hole saw drill bit, on the bottom of the cabinet make sure to go through both layers of metal, it will take a few minutes. Once the hole is made you'll want to spray the exposed metal edges with white zinc paint to prevent rust. Top it with a 2" Grommet for a cleaner look.

Acrylic shelving gives a clean finished look.
Shelving
For the milsbo wide, this ones optional, for the milsbo tall unless you have some enormous plants you are probably going to want a place for your plant babies to sit.
There are a lot of solutions here. At the affordable end is premade rubbermaid closet shelves. The cabinet shown lives in my bedroom, where I wanted something that looked cleaner than white closet shelving so I opted for laser cut acrylic shelves.
While I contemplated making my own shelving, the cost of acrylic sheets left only a trivial savings over some of the premade vendors. The best deal I found was a 3 piece set at modern aqua for $150 shipped, which took about 10 days from order to delivery. Installation is straightforward, the shelves drop in.
I chose to put a corner shelf at the top, a u shelf in the middle, and a full shelf at the bottom, but feel free to configure in a way most suitable for the plants you intend to house.
Lighting


I've tried three or four brands of grow lights at this point and prefer the Barrina branded ones. I literally have dozens of them in 1 foot, 2 foot and 4 foot variations and excepting a box that came crushed from amazon have had no failures or returns. For my Milsbo cabinets the 1 foot variety works best (often times connected to make a 2 foot light via a seamless adaptor that comes with the product).
Part of the reason for my brand loyalty is the ability to power on without intervention. If theres a power outage while I am on vacation I want my plant lights to recover gracefully, the panels with built in timers generally do not. Additionally I prefer a 16 or 18 hour light cycle but many lights with built in timers do 4, 6 or 12 hour cycles.
Another perk of the Barrinas is they include a variety of cords and mounting hardware. For this project I used the included double sided tape to mount the lights. I put 4 lights at the top, and two on each shelf excepting the bottommost one, as I want lower light plants at the bottom. The resulting light levels are adequate but not super bright, you could easily add another 30 watts worth.
Note: the connecting cords that come with the 1 foot lights are a bit short, I used a few 2 foot connecting cords which were scavenged leftovers from a different Barrina set when going from one shelf to the next, if you need additional length you can find extensions on amazon.
Fans, shelving, lights and cable management
Fan(s)
You'll want good airflow to prevent mold and circulate air in your cabinet. I use a combination of fans. For my Milsbo wide for a long time I just used a desktop fan (I'm on my second one as I've been purchasing inexpensive ones which don't hold up to the humidity well). When I added the tall unit that shown in this article I decided to upgrade my fan setup.
These 80 mm case fans are attached to the top of the unit using magnetic screws. In a different cabine I utulize magnetic hooks and zip ties in place of the screws.
I decided I would try to circulate air through the cabinet by putting one blowing up towards the ceiling and one blowing down, I don't think I care for this configuration as it seems ineffective, if I were to do it again I would just face both fans downward. I also have a desk fan at the bottom of the unit. I intend to replace this with more case fans when the humidity gets it, as I like the form factor of the case fans better and if it wobbles into the wrong position the desktop fan will reverberate against the glass a bit and create unnecessary noise.
Cable Management
I reused leftover parts from a cable management kit, which so far has got me through a TV installation and 1 1/2 plant cabinets. This is one of my favorite mods, it makes routing and hiding all the cords easy and leaves a really clean look.

Weather stripped doors
Weather Stripping
In order to maximize humidity inside the cabinet we want to make it reasonably airtight. While the cabinet back and sides fit together quite snugly, the front and doors leave a lot of space for air to escape. Applying 1/8" adhesive insulating foam to the gaps will allow the cabinet to better maintain humidity. I put the foam on the outer edges of the door anywhere they meet the cabinet (on the door interior along the top, bottom, left hand side of the left door, right hand side of the right door). Additionally I add a strip to the right hand side of the left door where it meets the right door, this makes the cabinet harder to close but seals the space between the doors quite well. Make sure to allow room for the hinges and lock area to operate correctly.

A temperature and humidity sensor helps monitor the conditions inside the cabinet
Digital Humidity Monitor
Around 100% humidity you will see a lot of fogging and condensation on the glass panels, aside from this there are not a lot of visual clues when your humidity is too high, or two low.
A good humidity sensor, and knowing the ideal humidity of the plants you are putting into the cabinet - is important. I like these no frills sensors that I originally purchased to add to tubs in my greenhouse.
Power Strip & Smart Plug
I use a power strip with a few built in USB ports to avoid extra dongles. For smart plugs I like the Kasa Mini's. They integrate easily with alexa and google home and provide good timer functionality.
Humidifier
I saved this one for last. The most controversial mod among the greenhouse cabinet community is a humidifier inside the cabinet. Foremost because you probably don't need it - a good humidity for most plants is around 70%, A few hours after watering I see humidity hovering around 90% in my Milsbo wide and around 80% in my Milsbo tall. Both these cabinets house a lot of plants, are well sealed, and have collection trays at the bottom where a bit of water sits, all factors which promote a more humid environment.
But because the environments are quite humid I don't need to water frequently, by the time plants are ready for water again the ambient humidity often goes down to 50% or even lower.
I have small desktop humidifiers in both units, which I occasionally activate manually to raise humidity levels. I generally aim for a level between 60% and 80% for the plants I have, but you may want to go lower for your plants - if I were housing my monstera collection - for example - I would probably aim closer to 60%.
A few important notes here: I see a lot of automations around humidity. Its probably best not to do that, a humidifier in your cabinet is a fire risk, use it wisely, activate it by hand for an hour or two, then let the humidity trail off over a few days. Theres no need to raise humidity to insane levels. While its easily possible to get above 100% humidity in a cabinet, theres very few plants that enjoy being this wet, and the electronics in your cabinet certainly won't like it. I've burned out electronics inside my cabinets (ironically a humidity sensor, and a fan so far) by raising levels too high, a much better idea is to target a reasonable level of humidity.
Materials
In my estimates below I price in the entire set for items that are sold by the pack, so the cost on subsequent cabinets or for example if you built out both would be a bit less expensive. I don't include tax, or any shipping charges. Linked products are ones I like and purchased for my cabinets and not sponsored.
Milsbo Tall: $658

Milsbo Tall Greenhouse Cabinet
- Milsbo Tall - $300
- Phillips screwdriver
- Drill
- 2" Hole Saw Drill Bit - $9
- Spray Paint - $10
- 2" Grommet - $7 / 5 pack
- Acrylic Shelving for Milsbo Tall - $150
- Barrina 10w Grow Light 8 pack - $45
- 80 mm Case Fan 2-pack - $15
- Magnetic Case Fan Mounts - $7
- 10 ft USB Extension Cable - $12 / 2-pack
- Desktop Mini Fan - $9
- Cable Management Kit - $15
- Humidity Monitors - $22 / 12 pack
- Power Strip - $13
- Kasa Mini Smart Plug - $24 / 4 pack
- Desktop Humidifier - $20
Milsbo Wide: $468
Milsbo Wide Greenhouse Cabinet
- Milsbo Wide - $260
- Phillips screwdriver
- Drill
- 2" Hole Saw Drill Bit - $9
- Spray Paint
- 2" Grommet - $7 / 5 pack
- Barrina 10w Grow Light 8 pack - $45
- 80 mm Case Fan 2-pack - $15
- Magnetic Case Fan Mounts - $7
- 10 ft USB Extension Cable - $12 / 2-pack
- Desktop Mini Fan - $9
- Cable Management Kit - $15
- Humidity Monitors - $22 / 12
- Power Strip - $13
- Kasa Mini Smart Plug - $24 / 4 pack
- Desktop Humidifier - $20
You'll Also Need:
- Plant Containers: Depending on your plant collection, gather the appropriate pots, trays, or shelves to fit inside the cabinet. If you need a solution to hold plants at the bottom, half sheet oven sheets fit the cabinet dimensions almost perfectly. My favorite places to get planters are Ikea and World Market.
- Plants: you've come to the right place :)
Conclusion
Building your own IKEA Milsbo plant cabinet is a rewarding project that not only adds a touch of greenery to your home but also allows you to showcase your plant collection in a stylish and organized manner. By following this step-by-step guide and customizing your cabinet to fit your unique style, you can create a delightful oasis for your indoor plants. Remember to enjoy the process, experiment with different plant arrangements, and watch as your cabinet evolves into a beautiful centerpiece for your room. Happy planting!